Cheap Kitchen Makeover
Wednesday, April 07, 2010
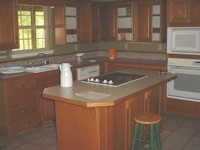
We recently bought a foreclosed house that needed a lot of work. We also still have another house that hasn’t sold, so we didn’t want to shell out a fortune on kitchen counters - I’m opting for a really nice master bath first! The cabinets in the kitchen were standard builder’s grade oak. The counter tops were beige laminate. Nothing horrendous – just boring. There was a hideous tile border at the back of the counter that I ripped out. The house is only about 12 years old. The previous owners had painted it dark green and then sponge painted over it, which didn’t do the counters and cabinets any justice at all. We painted it yellow. Here is a before picture and a picture once we painted.
 
We talked about re-laminating the counter tops, but I wasn’t really in love with that either. After a fair amount of online research, I figured out that lots of people were painting their laminate counter tops — yes, I said painting their counter tops. Most of the ones I saw involved a sponge painting technique and some other creative painting. Here are some of the interesting ones that I found (mind you, I also saw some horrible ones)!
   
I’m really crafty, but I was worried about all that sponge painting — mostly based on the ugly ones I had seen. Google painted laminate counter tops. You’ll see what I am talking about. After some experimentation on the laundry room counter top, here’s what I ended up doing:
I SANDED THE LAMINATE AND WOOD EDGES – NOTHING SERIOUS JUST A LIGHT SAND
ROLLED ON 1 COAT OF GRIPPER PRIMER
AFTER THE PRIMER DRIED, I ROLLED ON 1 HEAVY COAT OF WHITE 1 PART EPOXY ACRYLIC GARAGE FLOOR PAINT MADE BY BEHR AND COVERED EVERY INCH OF THE PAINT WITH PAINT CHIPS (RIGHT NEXT TO THE GARAGE FLOOR PAINT, THEY HAVE PAINT CHIPS THAT ARE USED TO ADD TEXTURE TO THE GARAGE FLOOR. I GOT THE TAN MIX AT HOME DEPOT)
LET THAT DRY AND THEN WIPE OFF ALL OF THE EXCESS PAINT CHIPS (I SAVED AND REUSED THE ONES I WIPED OFF)
(EPOXY PAINT TAKES A LITTLE WHILE TO CURE COMPLETELY – I THINK WE LET IS SET 2 DAYS, BUT IT FELT DRY TO THE TOUCH AFTER JUST A FEW HOURS)
THEN WE DID A SEAL COAT OF EPOXY GLAZE — IT’S THE ONE AND ONLY BRAND OUR LOWE’S HAD BUT FROM WHAT I’VE READ IT’S JUST LIKE THE ENVIROTEC EVERYONE IS ALWAYS TALKING ABOUT – WE BRUSHED THE 1ST COAT ON W/ SPONGE BRUSHES THEN DID A POUR ON COAT THE NEXT DAY.
MY EXPERIMENTAL COUNTER WAS IN THE LAUNDRY ROOM AND I USED A CHOCOLATE BROWN BASE W/ THE CHIPS — IT WAS WAY TOO DARK. ANYWAY, I COATED IT W/ 5 COATS OF POLY, BUT NOW THAT I’VE SEEN THE EPOXY GLAZE, THERE’S NO DOUBT THE EPOXY GLAZE LOOKS THE BEST. IT GIVES IT THAT DEPTH THAT GRANITE TOPS HAVE. THE BRAND WE BOUGHT SAID IT WAS LIKE ADDING 50 COATS OF POLY — I DON’T KNOW ABOUT YOU BUT I DON’T HAVE TIME FOR THAT. WE ALMOST DIDN’T DO THE EPOXY GLAZE BUT NOW WE ARE BOTH ABSOLUTELY THRILLED WE DID. IT’S BEEN 6 MONTHS SINCE THE EXPERIMENTAL LAUNDRY ROOM COUNTER WITH THE POLY ON IT AND IT IS HIDEOUS. SO, THE LESSON HERE IS, DON’T USE POLY AND DON’T BE AFRAID OF EPOXY RESIN.
ALSO, ANOTHER FACTOR FOR ME PICKING THE EPOXY GLAZE ON TOP WAS THAT YOU CAN MAKE REPAIRS TO IT. POLY CAN’T BE REPAIRED B/C IT’S JUST LAYER UPON LAYER OF CLEAR COAT — THE LAYERS NEVER BOND TOGETHER. WITH THE EPOXY THEY DO BOND TOGETHER.
I cheated — I just did a cut and paste from something else that described everything I did, thus the caps. I also sanded, grippered, painted, glazed, sanded some more, and steel wooled the ugly cabinets. We changed the knobs, bought all new appliances, and put up a wainscoating backsplash — so that helped the whole look. Anyway, here are my after pictures –
  
The counters probably cost about $150 to do. The glass knobs were $50 at Hobby Lobby (1/2 off WOOHOO) — the knobs aren’t on the drawers in these pictures and the outlet covers were still off. The wood appliques we added to the cabinets by the sink were $10. The backsplash and trim were about $60. The paint was $25 for the cabinets and another $25 for the room.
www.prettyloot.com
0 Comments
| 


