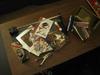
After the holidays, I am left contemplating a stack of beautiful cards that are too pretty to throw away. In the past, I’ve made them into gift tags, but there’s a limit to how many of those I can use per year. I’ve also given a lot of cards to a friend who converts them into pretty wall decorations with scripture verses and sends them to missionaries as gifts for the people they are serving.
Bookmarks are one thing that I never seem to have enough of. (At any given time, I will be reading five or six books.) I also like to give books as gifts and will often include a bookmark. I correspond via snail mail with a number of people as well and have found that bookmarks make nice tokens of esteem and liven up a letter. While traveling last summer, I bought photo bookmarks of that section of the Mississippi River in lieu of post cards (although postcards also make good bookmarks for bigger books)!
Making cards into bookmarks is simple.
1. If the back of the card is written on heavily, cut it off and retain the front, reinforcing it with white pasteboard or cardstock from another source. (I save stiff white cardboard packaging material rather than throwing it away or recycling it so I can reuse it to make bookmarks.) If the back of the card is not written on, simply glue the card shut and trim to the desired width. Sometimes I will fold the front of the card over and glue the halves together to stiffen it.
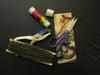
2. I use glue stick for most of my projects because it goes on relatively dry, and I make sure to apply the glue all the way to the edges so they don’t separate later. You could also use white tacky glue and spread a thin layer with a small paint brush.
3. One card can sometimes be made into several bookmarks, depending on its size and design. I usually trim off the greeting, unless it suits my purpose, and any excess cardstock to make a nicely proportioned finished product.
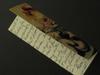
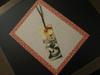
4. Finally, I punch a hole in the top of the card with a die cutter or hole punch and attach a ribbon or cord. Beads can be threaded onto the cord or ribbon to make the bookmark even more attractive.
Try making bookmarks out of birthday and anniversary cards you’ve saved because they were too pretty to discard (Sorry, I couldn’t resist!) or recycle. Even pretty product packaging can be made into attractive bookmarks. (I’ve even made bookmarks out of the printed linings of envelopes!) Have fun. Begonia
It was a lovely bright day here on My Little Farm in Town. The sun was shining and actually felt warm! My daughter andI spent the rest of the day sewing with a friend.
My friend is an excellent seamstress. I provided the fabric from my stash and she helped us make sense out of the diagrams and directions! She came in the morning and stayed until the sun went down.
We started out by chatting and looking through some books on making tote bags and purses that I had gotten from the library and picked up at my favorite library book sale. We settled on patterns from two books: The Total Tote Bag Book: Designer Totes to Craft and Carry by Joyce Aiken and Jean Ray Laury, Taplinger Publishing Co., New York, 1977; and Making Handbags: Retro, Chic, Luxurious by Ellen Goldstein-Lynch, Sarah Mullins, and Nicole Malone, Rockport Publishers, Gloucester, Mass., 2002.
We moved to the family room and combed through my extensive stash of fabric. I find fabric at garage sales throughout the season for as little as 75 cents per yard or less—April through November. Some of my fabric came from friends who were sharing large windfalls of material from quilters. I never turn down or pass up fabric, crafting materials, or art supplies because my daughter is very creative. If she doesn’t use the items now, they will be there when she is ready for them!
After a break to collect eggs and eat lunch, we started cutting and sewing. I’m not a great seamstress. (I once made a pair of shorts with one leg!) I just decided to jump in there and sew something myself. I’ve been watching my daughter sew her 4-H projects for a couple of years now, as well as lining up expert help to get her over the rough spots (such as a assistance with a plaid six-panel skirt for a season’s barter of fresh eggs).
In the midst of all this frantic creativity, I got some strawberries out of the freezer and made shortcake.
We ended the day with two completed tote bags and one still under construction. We invited my friend’s husband over to ruin his supper by eating dessert and drinking strong coffee with us first. It was a nice way to break up the tedium of winter by doing something different and creative with a dear friend.
Can you think of some activity you can share with a friend? Try something new! Begonia
I’ve been delving into my stash of yarn to make scarves for a clothing drive at church. It is a local effort to provide warm clothing for families in need. I am really enjoying crocheting again for a good cause.
Last spring, I hit a garage sale that had a lot of yarn during our village-wide extravaganza (95 sales in one weekend). The woman running the sale noticed me looking at the yarn. I picked up only one bag (I had pretty much run out of money by this time).I told her that I would be using it for charity work, and she said, “Oh, just take it all!” So here I am making scarves with it a year later true to my word.
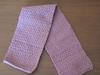
I’ve tried fancier patterns for scarves, but this granite stitch goes quickly, is flexible, and is very warm. I can make a 4- or 5-foot scarf a day if my needle doesn’t start smoking too much!
Easy Granite Stitch Crocheted Scarf
Choose a needle that complements the thickness of yarn you plan to use . (Gauge will vary depending on size of needle and thickness of yarn.)
Chain 27 (or odd number of chain needed for desired width plus 2 chain for turning)
Row 1: Single crochet in third chain from hook, chain 1, skip 1 chain, and single crochet in next chain. Repeat across, single crocheting in final chain. Chain 2 and turn.
Row 2: Skip first single crochet and single crochet in first chain-one space of previous row, chain 1, single crochet in next chain-one space and repeat across. Single crochet in space between turning chain and the first single crochet of the previous row. Chain 2 and turn.
Repeatrow 2 until scarf is the desired length.
Add fringe or leave the edges of the scarf plain.
You can vary the pattern by using half, double, or treble crochet instead of the single crochet in the pattern shown. The result will be a more open “weave.”You can alsocreate insets of openworkby inserting rows of half and double crochet.
If you don’t have a good cause to donate these scarves to, you will also find that they make good gifts and beginner crochet projects. The first scarf I made using this stitch, manyyears ago, won a blue ribbon at the Eau Claire County Junior Fair! Have Fun, Begonia
Disclaimer: MyFrugalLife.com cannot accept any responsibility for any injury or damage that you may cause to yourself, others, or property when following any advice given on this site. MyFrugalLife.com has no control of how you may use information you get from this site and does not attest to the validity of any information found within. Much of this information comes from third parties (newsletter readers and other contributers). Use advice found in our newsletters and on our site with common sense and at your own risk. If you see something in our newsletters or on our site that you disagree with, please let us know. Our goal is print only valuable information and advice.