| Showing 4 posts in the Make Your Own category for this blog. |
Super Simple Yogurt Cheese
Monday, July 26, 2010
This is my favorite versatile, low-calorie spread. I use it on baked potatoes; as a dip served with pretzels, rice crackers, or vegetables; for breakfast on bagels; and for lunch spread on Wasa crisps and topped with tomato or sprouts. I like its tangy taste and its consistency—like whipped cream cheese. I especially enjoy making it in the summer when milk prices are low and I have plenty of fresh herbs in the garden to choose from
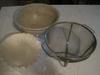
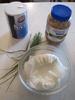
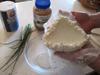
One of the best things about this cheese is that it is very easy to make! It takes no special equipment or procedures, so you probably have the necessary items to make it in your kitchen already. All you need is a colander, a large bowl, a basket-style coffee filter, plain yogurt, and salt and herbs to taste.
-
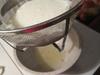
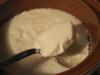
Put the colander in the bowl and the coffee filter in the colander.
-
Fill the filter with plain yogurt. You can make your own yogurt (See my blog, “Slow Cooker Yogurt” 7-24-2010, or you can buy it from a store. A quart of yogurt makes about 2 cups of the finished product.)
-
Leave the bowl with the colander and yogurt on the counter or put it into the refrigerator to drain.
-
Pour off the whey that collects in the bottom of the bowl periodically for about 8 to 12 hours or until it stops dripping.
-
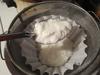
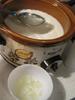
Turn finished cheese into a smaller bowl and blend in herbs and salt with a fork. (My favorite combination is garlic, chives, and salt!)
-
Cover and refrigerate.
Try making this simple cheese today! Begonia
Images:
0 Comments | Post Feedback |
|
Slow Cooker Yogurt
Saturday, July 24, 2010
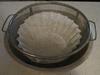
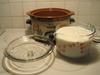
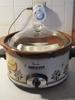
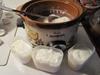
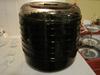
I love slow cookers. I own six of them in various sizes. All were purchased at less than bargain basement prices at various garage sales, with one exception. The slow cooker pictured was given to me as a college graduation present by my Mom and Dad—let us just say, “Long Ago.” I’m never happier than when I find a new (to me at least) use for a slow cooker!
I’ve been using a slow cooker to make yogurt lately. In the summer, we use quite a bit of yogurt in smoothies when fruit is cheap and plentiful. Those little containers of yogurt are pricey, but for the price of one single-serving container of plain yogurt, two quarts of milk (I use 1% milk), and the small amount of electricity a slow cooker uses, you can make 2 quarts of plain yogurt. Here’s how you do it!
First, pick out a two-quart or slightly larger slow cooker because that is how much milk you will be using (less milk smaller size cooker, more milk larger size cooker).
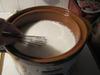
Second, pour two quarts of milk into it and put the lid on. Cook on low for the next three hours.
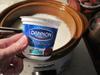
Third, when the three hours have passed, unplug or turn off the crock pot (leave the lid on) allow the milk to cool for two to two and a half hours or until the milk reaches 90-113°F. (I use a yogurt thermometer from one of my electric yogurt makers.) Then whisk a single-serving container of plain yogurt (about 6-8 ounces) into the warm milk.
There are live cultures in all yogurt, but plain is best because there are no coloring or flavorings that make it harder for these cultures to grow. If you use a soft yogurt like Yoplait, you will have a soft end-product; if you use a firm yogurt like Dannon, you will get a firmer end-product.
Fourth, put the lid back on the slow cooker and wrap it in a couple of big towels. Let stand at least 8 hours or overnight.
I’ve been pretty pleased with the results. I use one quart to make a very simple yogurt cheese and most of the other for smoothies, with the last 6-8 ounces reserved to start the next batch. Try this method out for yourself—I’d love to hear how it works for you! Begonia
Images:
2 Comments | Post Feedback |
|
Drying Herbs at Home: 2009 AND 2010 Parsley
Sunday, May 09, 2010
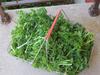
I’ve been harvesting parsley for drying on My Little Farm in Town this week! I planted it last year from seed and transplanted it to form a border for my front walk. Last year, I harvested and begged everyone else to harvest it. (See my January 28 blog—Eggs, Parsley, and Barter) Parsley is the ultimate cut-and-come-again herb. It’s easy to grow enough in your yard to supply your family’s needs for an entire year and save a little on your grocery bill in the process. It is also an herb that easily makes it through the winter and comes again in the spring! It and chives are the first fresh herbs that I harvest each year.
I’ve been a tad late starting my seeds this year and am a bit short on garden space. So I’ve decided to harvest and dry parsley early and just grow a few plants this season for fresh use.
Parsley is a biennial. It grows leaves the first year and flowers and goes to seed the second year. It will supply you with plenty of green until about May (in this hemisphere anyway) and then it bolts, and you dig it out and add it to your compost pile if you don’t intend to save seed.
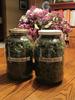
Parsley is one of the easiest herbs to dry. (Some sources claim that it doesn’t taste good when dried. I can only guess that they dried it at high temperatures, because my parsley always tastes fine.) I harvest when the dew has dried off the plants by breaking or cutting the stems a couple of inches from ground level. I then cut the leaves from the stems with my trusty kitchen scissors right into my drying trays. I don’t wash them. If a stem is too soiled, I add it to my compost bin. Parsley doesn’t take long to dry—when it is crunchy, it is done. (Be sure to let your test leaf cool before trying to crumble it.) If you have a simple convection dryer like mine, be sure to rotate the trays every couple of hours. Store the dry parsley in an airtight container in a dark, dry, cool place. If a recipe calls for a tablespoon of fresh parsley, you can substitute one teaspoon of your dried product.
I picked up my dryers for $5 each at garage sales, but you can often find them at thrift stores or buy them new if you have the funds. I prefer the dryers without fans and thermostats. I mainly dry fruits and vegetables so it is not a problem. These simple driers are usually cheaper and work just as well for my purposes. Some herbs like basil I prefer to air dry out of the sun (always) because it is so easy to cook them and lose all their volatile oils.
Other ways to dry herbs include hanging them in a dry, dark place; drying on screen frames outside; and drying on trays (always protected from direct light) in your car, in a gas oven with the pilot light lit, or in an electric oven with the door closed and the light on, or even in the microwave oven!
The moral of the story is—Don’t pull that parsley in the fall. Let it overwinter and feed you for another season! Begonia.
Images:
0 Comments | Post Feedback |
|
Make Your Own: Room Scents for Cents
Sunday, February 07, 2010
My good neighbor down the street is a truly green person. (She earnestly tries to treads as lightly on the earth as an American can.) She introduced me to making my own non-aerosol room sprays.
I used to buy orange spray and other scents of spray from time to time from home decorating parties (or from the garage sales of people who had attended these parties). These sprays consisted of some kind of mysterious liquid and scent.
It turns out that (in my neighbor's recipe) the mysterious liquid is water and the scent is essential oil. I reuse the glass bottles and spray pumps of some room sprays I found at garage sales for fifty cents or a couple of dollars. (The original price was $10 at a home party--I imagine they are more expensive now.) I have a stash of essential oils that I amassed during a period of potpourri making years ago. I also find bottles of essential oils at sales for a dime or quarter. (I don't like to pay more than 50 cents.)
I pour 12 or 13 drops of essential oil into the empty spray bottle and top it up with water from the tap. You can add more oil depending on how strong you want the scent. You can blend oils or use only one scent at a time. I like lavender and cinnamon but have also used and blends of evergreen oils.
It's nice to know exactly what you are spraying and breathing. I also enjoy tailoring the scent to the season. Happy spritzing. Begonia
0 Comments | Post Feedback |
|
|